


BEERKNIGHT RULES V9
Beer Knight
A Game to Play While Drinking
A rather silly but competitive card battling & dice game for 2 players (with a variation for 4 players).
Playtime: about 45-60 minutes, once you know what you are doing (before that, it’s kinda a bit nebulous because you are all unique and individual people).
Components: What You GET
1 Deck of 24 Knights
1 Deck of 24 Mounts
1 Deck of 24 Weapons
1 Deck of 36 Challenges
2 Card Sized Cheat Sheets
8 Sweet 12 Sided Dice (D12)
2 Handy Score Cards + 2 Tracker Tokens
2 Beer Tent + 2 Beerhalla Markers
8 “W” Tokens (W means Winner!)
Players create card combos to gain points, roll dice to attack their opponent, react to a challenge event, and use special abilities to try and score the highest—all to get their Knights into Beerhalla!
Card Descriptions
Beer KNIGHT CARDS: these are your Warriors! You want them to win! They have special abilities called Liquid Courage, Card Powers and Pair Abilities that combine with Mount and Weapon Cards. Knights have Card Powers 1-6. Knights have styles: Hoppy, Strong, Light, Dark, Amber, Golden, Funk, and Double. (Combat Combo Card)
Foamy MOUNT CARDS: your Knight rides a Canned Creature into battle! They have special abilities called Hold My Beer, Card Powers and Pair Abilities as well. Mounts have Card Powers 1-5. Mounts have styles: Hoppy, Strong, Light, Dark, Amber, Golden, Funk, and Double. (Combat Combo Card)
Awesome WEAPONS CARDS: this is the which with which your fighter fights. They also have special abilities called Hold My Beer, Card Powers and Pair Abilities. Weapons have Card Powers 1-4. Weapons have styles: Sword, Polearm, Edged, Blunt, and Weird. (Combat Combo Card)
Challenging CHALLENGES: These are events that occur during Combat and can affect both Knights. Sometimes these are Bad Things. Sometimes these are Good Things. (Challenge Event Card)
Knight, Mount and Weapon Cards all share one of three front border styles. Use these for the Last Call special ability. Challenge Cards have a Blue and Black front border - these help you know more about their effects.
Winning: Ascend to Beerhalla!
The player with the highest score at the end of a Combat Round wins, and gets a “W” token.
A game consists of multiple Combat Rounds — when a player gets two Wins (2 “W” tokens) that Knight ascends to their Beerhalla.
The first player with two Knights in Beerhalla wins the game! Huzzah!
SETUP: Shuffle and Get Ready!
Shuffle each deck. Put the Knight, Mount and Weapons (Combat Cards) decks on one side of the table, and put the Challenge Deck opposite.
Place a Score Card next to each Player. Place the Scorekeeping Token at Lucky 13 for each player at the start. Place both Beerhalla Tokens on the same side as the Challenge Deck. Place both Beer Tent Tokens on the same side as the Combat Cards
DEAL: The Hidden Hand.
Deal 3 cards facedown from each Combat Card deck (Knight, Mount, Weapon) to each player. This is your Hidden Hand. Pick them up right away—but always keep them hidden from your opponent. If any draw deck is ever depleted, shuffle the discards immediately to recreate the draw.
NOTE: This is a game of card attrition. The only way to get more cards is through special card abilities; or when a player gets a Knight in Beerhalla. When a Knight gets into Beerhalla you reshuffle and deal a fresh set of cards.
Game Setup
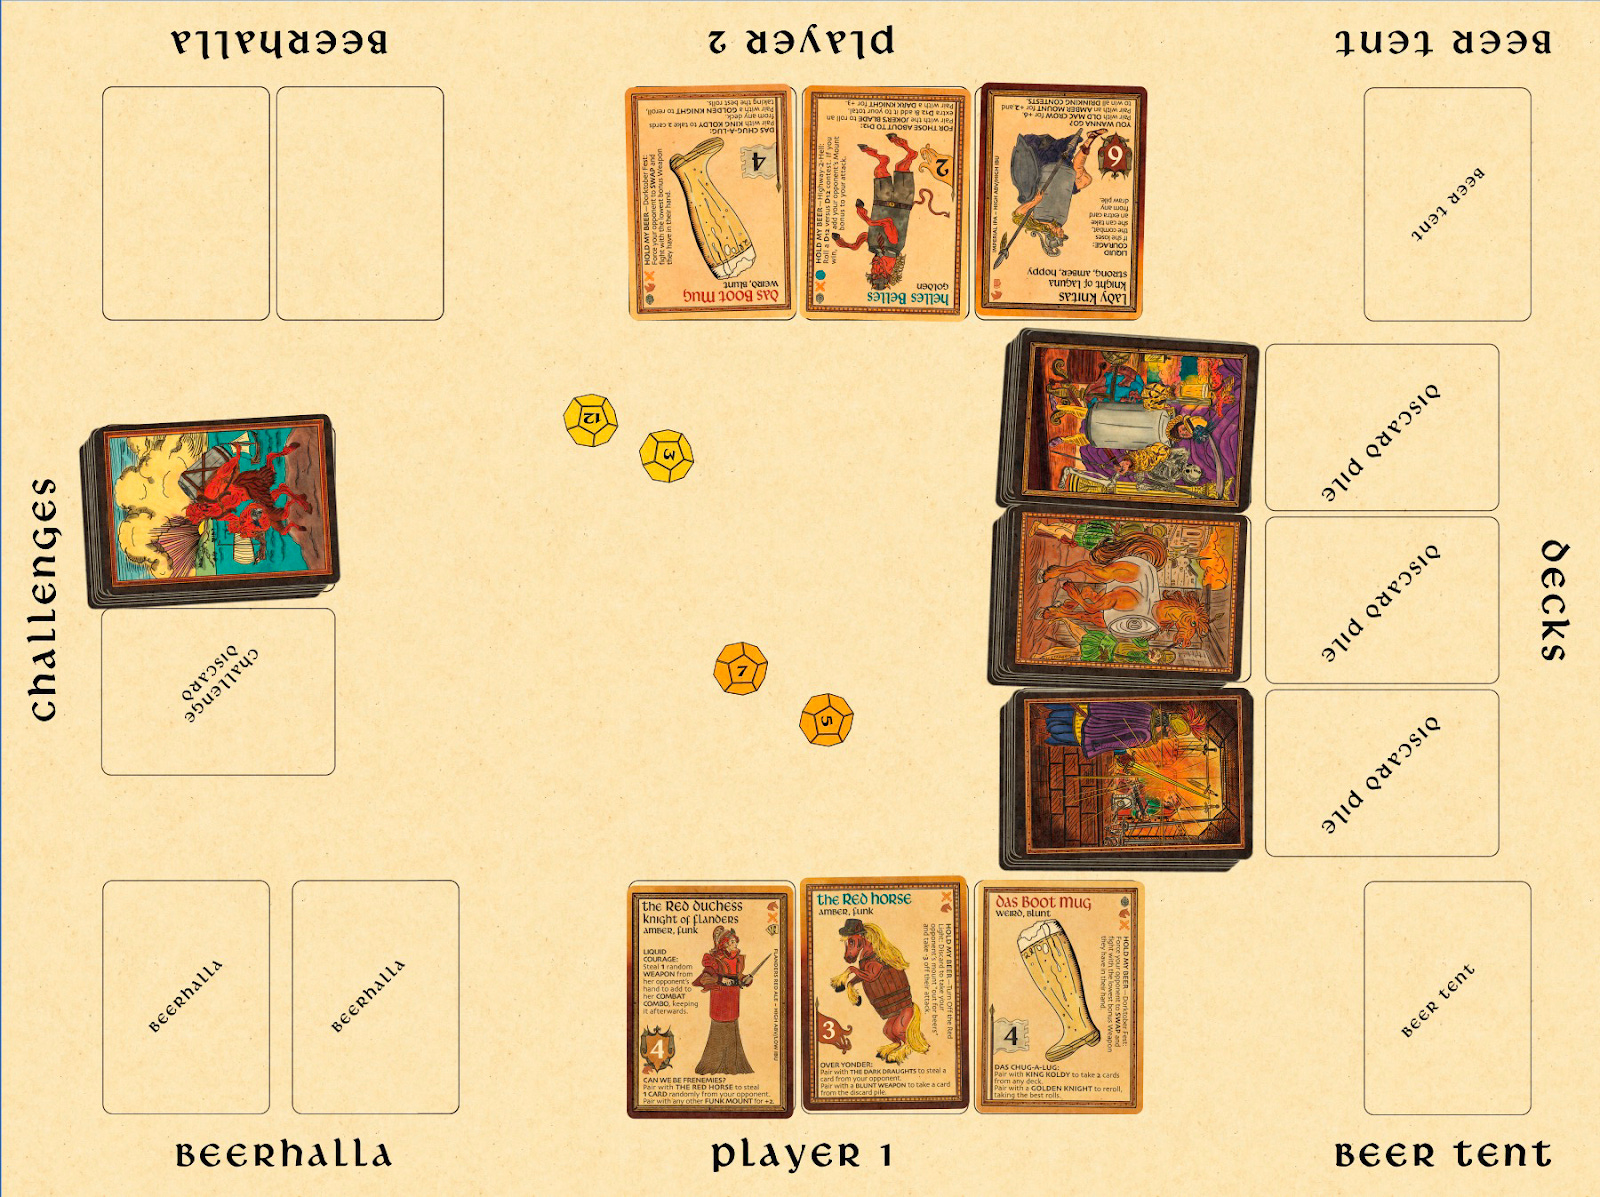
Figure 1 - Gameboard initial setup - Combat Combos flipped for Battle!
Teaching Round(s)
Make these modifications to the rules to get comfortable with Beer Knight before you jump into the full fray!
KNIGHT PAIRS: Only use the Pairing text on the bottom of the Knight cards; just ignore the lower text on the Mounts and Weapons.
OPEN FACED: Play all cards face up on the table and play cooperatively (you’ll still battle, but help each other learn the game.)
ONLY BLACK BORDERED CHALLENGE CARDS: Use on the Challenge Cards with the dark black borders. The Blue Bordered cards always change the following combat.
Play by Play
A—Creating a Combat Combo:
The goal is to select your best COMBAT COMBO of one Knight, Mount and Weapon card. You are looking for the best total of CARD POWERS; these are found in the Shield symbol for Knights, Pennant symbol for Mounts and Flag symbol for Weapons. You are also looking for the best BATTLE BUFFS – the combination of Pairing matches, and Liquid Courage (LC).
Start by examining the Knight Card Powers, and the Pairing text (at the bottom). See if you have any matching Names or Styles in your Mount and Weapon cards. Once you’ve selected a candidate from all three types, look at the total of the Card Powers. Now examine the Battle Buffs (Pairs and Liquid Courage) to see what additional points you can gain with this combination.
Pairings and Liquid Courage can significantly increase your Battle Score, converting cards that have weak Powers into Powerhouses. Some cards let you reroll your Attack Dice, which can significantly boost your odds. Liquid Courage is only played from the Combat Combo.
Note: Knights can only fight once! They retire after the fight to your Beer Tent, or if they are especially lucky, ascend to your Beerhalla.
B—Fixed to Fight:
Place your Combat Combo face down on the table when ready. Feel free to trash talk if you are the first player to do so.
While you wait, read the secondary Hold My Beer (HMB) abilities of the remaining Mount and Weapon cards in your Hand, and select the one you think you will play. HMB happens after dice rolls, and it's optional. It is a discard ability, so once you’ve played it, you get rid of the card.
C—Reveal Your Combo:
Each player flips their cards face up at the same time. They should introduce their roster to the other player in an intimidating fashion (& preferably in a funny voice. Or not. Be boring).
Take note of your opponent’s cards —some abilities refer to the Style or Type of a Card you are up against (VERSUS) – this might add points to your score, or give you a dice reroll.
Each Liquid Courage is unique — some are card abilities, some are dice rerolls, some even let you summon a Monster to fight alongside you. It’s important to know when to use your Liquid Courage—each card will help you to know when.
Liquid Courage only happens once per combat, per Knight that is played in the Combat Combo. You might end up playing 2 Knights in the same Combo; in that case you would get to use both of their LC.
D—Add up Card Powers & Buffs:
Each player adds up their total Card Power and moves their scoreing token on the scorecard. Move it again for any additional bonuses you get from Liquid Courage and Pairings.
E—Attack Rolls:
Each player attacks by rolling two 12 sided dice and adding them together. This total is your Attack Roll. Some special abilities let you reroll dice, or force your opponent to do so. Add your ATTACK ROLL to the Scorecard.
IMPORTANT: Leave your dice on the table so you can remember what you rolled! If you need to reroll, use the other dice, or make a note.
Remember that you get to take the best 2 dice, unless a card specifically says otherwise. If you rolled a 2 and 10, and had the ability to reroll, rolling a 11 and a 3 on the second roll, you would pick the 10 and the 11 for a combined score of 21.
F—Hold My Beer:
HMB is a special ability found on Mount and Weapon cards, in your Hidden Hand. They can let you steal cards, force new dice rolls, or otherwise change the combat.
If HMB changes the dice rolls, removes cards, or otherwise changes the score, subtract the difference from the scorecard.
Remember that this is a discard ability, so after you play this card, you get rid of it. You only get to do this once per Combat.
G—Challenge Event:
Flip the top card of the Challenge deck and deal with whatever it throws at the table. Each Challenge is different — there is no universal rule. Some may involve a dice roll, a contest, losing or gaining cards, or a unique condition. If both players fail the Challenge, both suffer the outcome listed. Sometimes a card in your Combo might let you skip, win or reroll a Challenge.
On the Next Combat: The blue bordered Challenge cards are events that either carry over to the next Combat Round, or might add a + or - to the next combat. If, for example, it creates a penalty to the next combat, you’ll subtract that from your initial 13 points. Put that Challenge card in the center and keep it there until you resolve it at the start of the next combat.
H—Last Call!
One last chance to win! If a player has TWO CARDS in their hand with matching edges*, they can discard them to make a LAST CALL. Roll one final DIE and add that number to the total score. If someone wins this way, the other player can try to steal victory back with a LAST CALL of their own! Sometimes it's better to give the other player the win to hang on to your cards, if you think you’ll have a better chance of winning the next combat; but, if your opponent is about to go to Beerhalla, you have nothing to lose!
Remember, this is a discard ability, and you only get to do this once.
*There are three different edge borders: Dark, Medium and Light. Each Knight, Mount and Weapon card uses one of these three.
I—Winner Winner:
The highest score wins and declares Victory!
Combat Win: Grab a “W'' token and display it triumphantly on your scorecard. If no Knights have gone to Beerhalla, both Players put their Knights under their Beer Tent marker. These Knights don’t fight again, but can be used for Last Call, or Card Swaps. Players put their Mount and Weapon cards back into their Hidden Hand. Card Swap: at this point, a Player can discard 1 of any card type from their Hand (or Beer Tent) for any card from the Draw piles. If a Player is missing a card type, at the beginning of the Combat they can take 1 of that type—Players can always put together a Combo.
Start the next Combat now!
Beerhalla Win: If a Player has won twice (2 “W” tokens), then several things happen: the winning player puts their Knight under their Beerhalla marker If it’s only one, all Knight, Mount and Weapon cards are put back into the decks (even the Beer Tent Knights) and shuffled, and a new deal is dealt.
Start the next Combat now!
Game Win: If a player has two Knights in Beerhalla, they Win the Game! Huzzah!
Combat Tie: There are times when there will be a Tie Game—just move on to the next Combat.
Beerhalla Sudden Death: In rare cases, it is possible for both players to have two wins at the same time — in this case, neither Knight goes to Beerhalla. The game is decided by whoever wins the next Combat.
EXAMPLES
ANATOMY OF A CARD
SCORECARD

Figure 2A - Scorecard – Player One in the Starting Position of 13 Points.
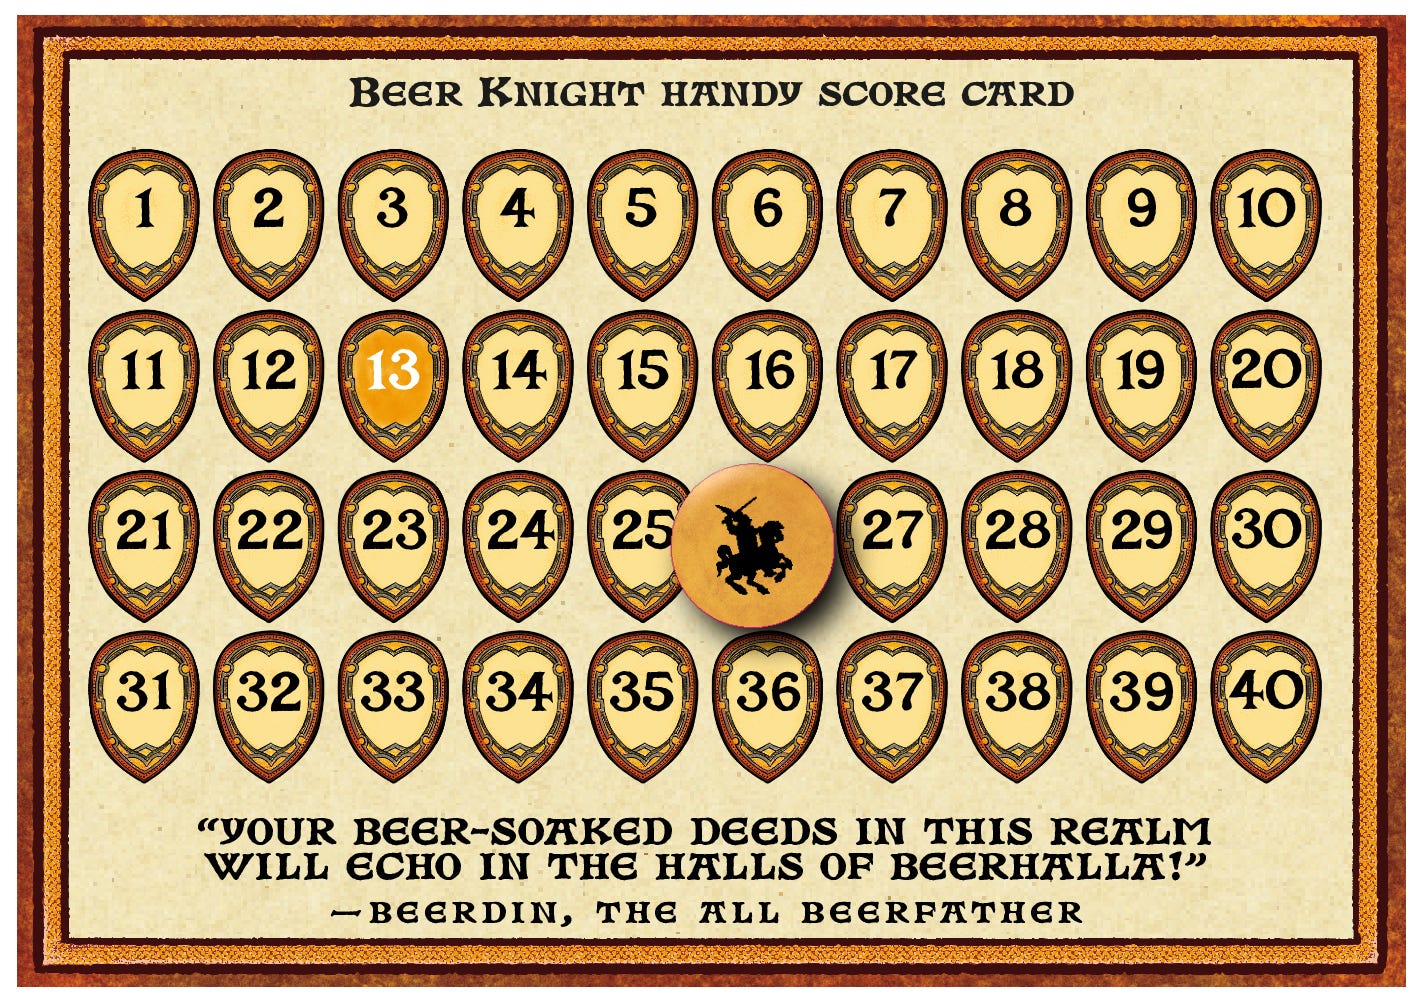
Figure 2B - Scorecard – Player One has 8 points from their Card Powers, and another 5 points from their Pair buffs for a total Combat Score of 26 points.
GAMEBOARD

Figure 3 - Gameboard – Discards shown. Player 1 has 1 Knight in the Beer Tent and 1 Knight in Beerhalla! The Beersalisk (Monster) Challenge Card has been revealed.
COMBAT COMBO

Figure 4 - PLAYER 1 Combat Combo –The Red Duchess pairs with The Red Horse to steal a random card from their opponent. The Red Horse pairs with any Blunt Weapon. The Das Boot Mug is Blunt, which allows this player to take a card from any Discard Pile. The Battle Bonus is 11 – but the Red Duchess’ Liquid Courage allows her to steal a (second) random Card – specifically a Weapon Card — and add it to her Combo. This adds a second Weapon, with its Pair and Battle Bonus to Player 1s mix. Player 1 rolls 2d12 and gets a 3 and a 7 for a 10. 10 + 11 = 21 Score!
The icons on the Red Duchess indicate she has PAIR connections to both Mounts and Weapons, and has a Card Ability. The icons on the Red Horse indicate a connection to Weapon Cards, and other Mounts (which, in this case, is a Hold My Beer ability). The Das Boot Mug has icons connecting it to Knights, Mounts and Weapons (which, in this case, is a Hold My Beer ability).
HOLD MY BEER ABILITY

Figure 5 - PLAYER 2 plays a Hold My Beer ability. They remove the Red Duchess from Player 1’s COMBAT COMBO! Since Player 1 already used Liquid Courage, that has happened and is NOT undone, but her Battle Bonus of 4 is subtracted from Player 1’s Total. Player 1 has to discard The Red Duchess and draw, and play, a new Knight from the deck.
The Rammy Tammy card is a Weird and Blunt weapon. The icons indicate a connection to Knight Cards, Mount Cards, and Drinking Contest Challenges.
CHALLENGE EVENT

Figure 6 - The Beersalisk is revealed during the CHALLENGE event! This card changes the upcoming combat. In the new Combat both players create new Combos. The new Knights both have to roll against the Beersalisk. Sir Mick The “Dee” has a value of 4, and Player 1 rolls a 6, for a combined 10. Player 2 has The Lord of the West, with a value of 5 and rolls a 7, for a combined 12. The Beersalisk rolls an 8, for an 8+4 = 11. The Beersalisk beats Sir Mick, but not The Lord of the West. Sir Mick (Player 1) is petrified for the round – he remains in play, but is not able to add his value or use his Liquid Courage. Carefully reading the text tells Player 1 that while Sir Mick can’t fight directly, if they have Honey Dee as their mount card, they still get the extra +4 from the Pair ability of Sir Mick.
LAST CALL
Figure 7 - PLAYER 1 uses Last Call to try and beat Player 2 – by discarding two cards with the same border, they can roll one more D12 and add it to their total. They roll a 7 and add that to their final score. Note that the cards themselves aren’t used for anything other than the discard.
MORE CHALLENGING PLAY
You want it to be trickier? A little more edgy? Dangerous even? We are here for you!
CHALLENGE CARDS: any BLUE BORDERED cards affects carry over to the next combat round, even if a Knight went to Beerhalla.
NO SWAPS: you play the cards you acquire, but can’t trade.
NEW ROLLS ONLY: if you re-roll dice, you have to take the new rolls no matter what.
HARD MODE: use one DIE – wherever the rules or cards have you rolling 2 DICE, roll 1. If it says roll/reroll all/both/two, you roll one.
Beer Knight FAQ
Frequently Argued Questions (because someone always argues)
🛡 COMBAT & COMBOS
A Combat Combo is what you’re fighting with: 1 Knight, 1 Mount, and 1 Weapon built from your Hidden Hand.
Pairings are special combinations of cards that increase scores or activate unique abilities. These only count within your current Combat Combo.
Liquid Courage (LC) is a Knight card ability. It triggers only with the Knight in your Combo — not from your hand — and is once per Combat.
Hold My Beer (HMB) is played from your Hidden Hand, not your Combo. It’s a once-per-combat discard ability used after Combos are revealed and dice have been rolled.
If you can't make a full Combo (e.g., no Weapon), use the Take a Card Rule — draw the missing type and immediately use it.
🎲 DICE & ROLLING RULES
During combat, each player rolls 2 DICE and adds the results.
Always leave your dice on the table so you know what you rolled!
General dice rule: take the two highest rolls if you reroll or get an extra dice.
Exception: specific cards may force you (or your opponent) to take the lowest rolls.
If you roll doubles, you may reroll both dice, but you must take the new result.
Specific rules beat general rules.
Some cards add extra dice, letting you choose the best 2 rolls. Some cards let you reroll 1 or more dice.
Banked Dice: Some cards let you roll and "bank" a die for use later, allowing you to replace a bad roll with a better one. Some cards even let you do this to your opponent, swapping a good roll for a bad one. The only thing you CAN’T do is replace a banked roll with another banked roll.
Contests: If you run into a Challenge that has you rolling a contest against a Monster (for example), someone needs to roll a DIE for the Monster – then both Players roll against that score.
🍺 CHALLENGE EVENTS
Challenges happen after HMB and before Last Call.
Challenge types: Beerocracy, Drinking Contests, Monsters.
Some Challenges resolve immediately
Blue Bordered Challenge Cards always affect the next Combat Round.
Your Combo (including Pairings or Liquid Courage) might change how you handle Challenges.
The Challenge Deck is not shuffled until every Challenge card has been played. If you manage to go all the way through this deck you now get to roll 3 ATTACK DICE (instead of 2) on every fight in this game session. Wooooo!
🔄 GAMEFLOW & VICTORY
Each Knight fights only once — after combat, they go to the Beer Tent or ascend to Beerhalla.
A player who wins 2 Combats sends their current Knight to Beerhalla.
The first player with 2 Knights in Beerhalla wins the game.
The Combat → Challenge sequence repeats until someone ascends to Beerhalla.
After a Knight enters Beerhalla, shuffle the Knight, Mount, and Weapon decks (excluding Beerhalla Knights).
⚔ STYLES, BORDERS & LAST CALL
Knight & Mount styles: Hoppy, Strong, Light, Dark, Amber, Golden, Funk, Double.
Weapon styles: Sword, Polearm, Edged, Blunt, Weird.
There are three border types on Knights, Mounts & Weapons used for Last Call.
Knights in the Beer Tent can be used for Last Call.
📦 CARDS & DRAWING
You don’t draw new cards unless a card ability (Pairing, LC, or HMB) allows it, or a Challenge instructs you to, or you are using the Take One Rule.
Mount and Weapon cards can be reused as long as they remain in your hand.
Card Swap: Before the next Combat begins you can discard one card from your hand, or from the Beer Tent, and draw one new card of any type.
Take One Rule: If for any reason, at the start of Combat, you don’t have a required card (you are missing a Weapon, for example) you should immediately draw a replacement and play it.
Other Rules
SPECIFIC: If a card has a specific rule that breaks a general rule, the specific rule wins.
SECOND CHANCE KNIGHTS: Knights that are removed from the battle before they finish the fight and are put back into your hand can fight again. Knights that are discarded, end up in the Beer Tent or Beerhalla cannot fight again.
ALWAYS IN BEERHALLA: Knights cannot be removed from their glorious afterlife in Beerhalla.
CONTESTS: When a card says “Roll a contest,” you generally are rolling a Card Power + Die Roll VS the other player, or a Monster, or sometimes an NPC. Someone needs to roll for the Monster.
WHO GOES FIRST? If you ever need to figure out who goes first, each player rolls a DIE, the highest number wins. Reroll ties. You can do this.
NO NEGATIVE BONUS: Your Battle Bonus can’t be a negative, it can only go down to zero. I mean, that already sucks, why would we make it worse?
RE-ROLL RULE: We shouldn’t have to say this, but we also know you. You know who you are. You're “that person” – the nitpicking rules lawyer. Feel seen. Also feel that any time a card says you can “reroll any dice” we mean you can do that once.
Definitions
BEER TENT: A place of easy chairs and beer coolers. Battling is hard work! Victor or Vanquished, both Knights only fight once, and end up in their Player’s exclusive VIP Beer Tent.
BEERHALLA: A place of victory! Each player has their own Beerhalla, where their Victorious Knight ascends to. Once a Knight is in Beerhall, they can’t be removed. They are not put back into the deck when Combat resets.
CARD POWER: The combined value of your Knight, Mount, and Weapon, as well as any buffs or abilities (like LC or Pairings) that increase the total.
CHALLENGES: Events that occur during combat, requiring both players to deal with the scenario. Challenges can affect the next Combat Round or require a dice roll or contest. Some HMB abilities are tied to Challenges and can be used during this phase.
COMBAT COMBO: 1 Knight, 1 Mount, 1 Weapon.
COMBAT ROUND: A single fight where a Player emerges with victory, loss or tie.
COMBAT TOURNEY: A series of Combat Rounds – however many it takes for a Player to put a Knight in Beerhalla. As few as 2 Rounds, as many as 5+.
HIDDEN HAND: You start with nine cards, three of each type: Knight, Mount, Weapon. These are kept hidden from your opponent, though you may look at them at any time.
HOLD MY BEER (HMB): An optional secondary ability attached to Weapon or Mount cards. You can only play it from your hand, not from your Combat Combo.
LAST CALL: If you have two cards with matching borders (any combination of Knight, Weapon, or Mount), you can discard them to roll a final DIE and add that number to your total score. This is a last-ditch attempt to win a Combat Round.
LIQUID COURAGE (LC): Special abilities attached to the active Knight in your Combat Combo. LC can significantly boost your Card Power.
PAIRINGS: Certain Knights, Weapons, and Mounts have special buffs when paired together or when fighting against specific cards. These apply only to your Combat Combo, not to the cards in your hand.
STYLE & TYPE: Each Knight and Mount represents a beer style; Golden, Amber, Dark, Funk, Hoppy, Strong, Light. Weapons come in Edged, Blunt and Weird.
Optional Game Variations
Pair of Ducks Variation: A player must win two consecutive Combats to send a Knight to Beerhalla.
More is Always Better Variation: Players can choose a larger number of Knights in Beerhalla to win the game.
Speed Speed and More Speed Variation: Players only need to win a single Combat to get a Knight in Beerhalla. GAME OVER in three rounds, guaranteed!
Cutthroat Variation: Players only receive 6 cards (2 of each kind) to use in combat.
Lazy Sunday Variation: Players get to draw back up to 9 total cards in their Hidden Hand at the start of every combat round.
Why Would You Do This? Variation: Players create two combat combos, and both fight as a Team, combining scores for each combat.
Always In The Third Person: An extra Hand is dealt face up of just THREE CARDS, creating an NPC player. To Win a Combat Round, you have to beat both your opponent and the NPC. A random Weapon or Mount card is drawn and played for the NPC during HMB. The NPC is discarded and re-dealt each Combat Round, and cannot go to Beerhalla.
Tag Teams Variation: For Four Players. All four players roll a D12. The highest and lowest rolls are teamed up.
Each player receives 6 cards (2 of each kind) and works with their teammate. Combat happens as normal.
Both teammates combine their final scores after Last Call. The highest combined total wins.
During the Trade In phase, teammates can swap cards with each other.
Secret Game Expansion
Don’t Read Any Further! You have been warned! This Rule Book is Over.
Still here, huh? Well. Ok. How about this?
Is Beer Knight too simple? Is it over too soon? Do you want MOAR? How about playing a round of—
New Beerland World Domination!
Welcome to New Beerland! Twelve Baronies full of drunk and disorderly denizens. It's up to you to become a Beer Baron and unite all of the Baronies and bring stability. How? Listen up, bub:
Each time you send a Knight to Beerhalla, you can take one of two actions:
The Unruly Lands: Take a card from the top of the Beer Barons deck - these are the Unruled Lands. Place your Knight and the Barony face up where your opponent can see them. You are now ruler of these lands – rule wisely and your Hops will everflower and your Steins will overflow!
Use your new Beer Baron Power to your advantage – there are 12 Baronys, each with a different power.
A Ruled Land: Want to take over someone else’s Barony? You’ll need to challenge the reigning Beer Baron. Equip your Knight with a Mount and Weapon from your Hidden Hand; your opponent does likewise.
Battle as usual, but no Hold My Beer and no Last Call. Liquid Courage still applies, if available.
The Winner takes (or keeps) control and places their Knight with the Barony card. Loser’s Knight goes back to the Beer Tent,
After every Baron Battle shuffle the Knight, Mount and Weapon decks and re-deal.
Victory: First player to control 7 out of 12 countries wins the game and is crowned the Beer King of New Beerland.